Custom Tag UI
- thanh pham
- 1 thg 9, 2023
- 5 phút đọc
Đã cập nhật: 2 thg 9, 2023
1. Requirements
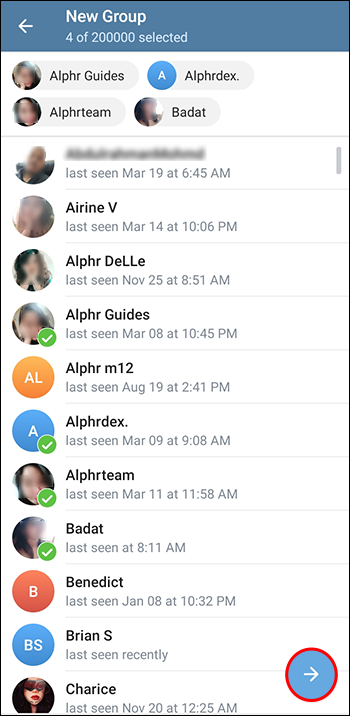
Recently, there has been a layout used by many companies such as creating groups in Facebook Messenger, creating groups in Telegram, and sending emails in Gmail to many people at the same time.
For example, Telegram:

Request here:
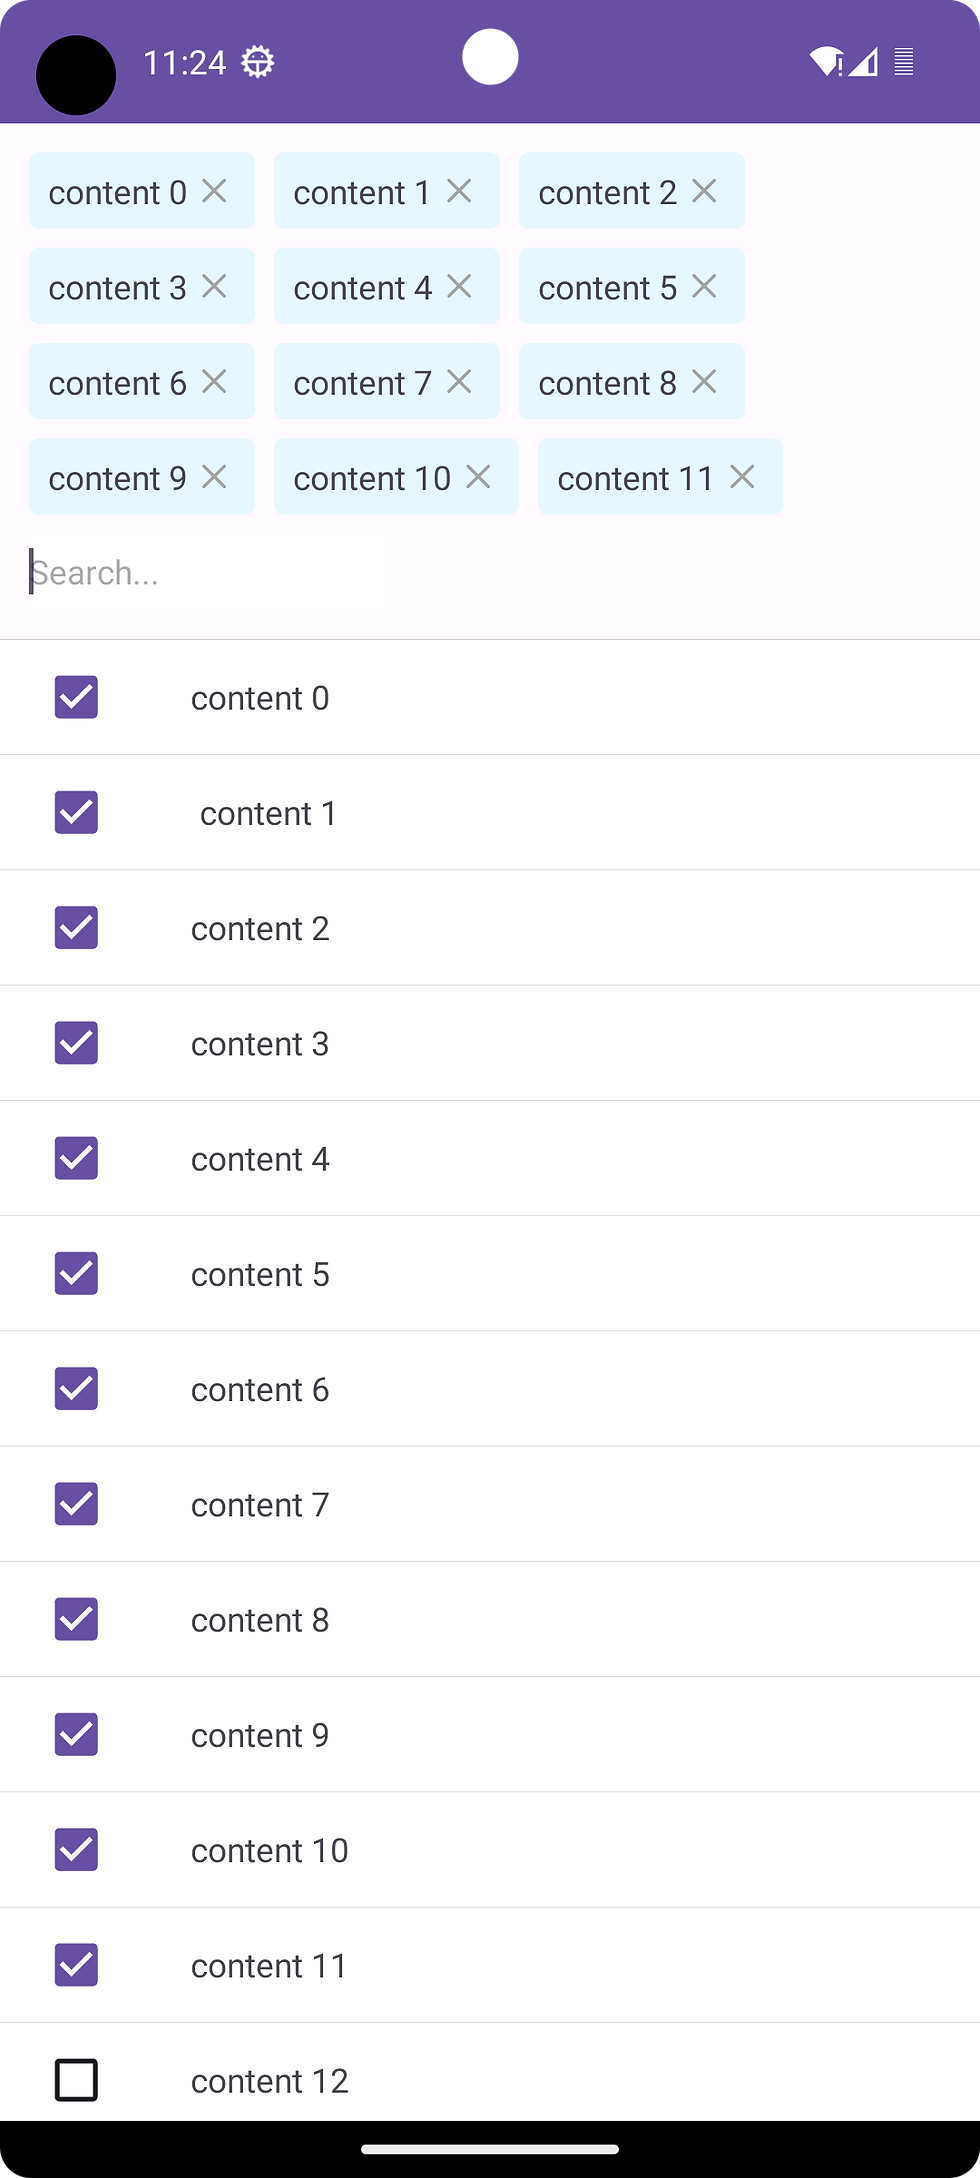
A list displays selected items
There is a search bar to be able to search
A list displays all elements
Can interact with items in both lists
2. Create a Custom Tag View
The solution here is that you need to calculate the following data
Length of parent view
The length of each added child view
Arrange the child views from left to right so that the length of the child views in a row cannot be greater than the length of the parent view.
-> Let's get started.

Here I use the ViewGroup
class CustomTagView @JvmOverloads constructor( context: Context, attrs: AttributeSet? = null, defStyleAttr: Int = 0 ) : ViewGroup(context, attrs, defStyleAttr) { var viewGroupWidth = 0 init { init(context) } private fun init(context: Context) { val display = (context.getSystemService(Context.WINDOW_SERVICE) as WindowManager).defaultDisplay val deviceDisplay = Point() display.getSize(deviceDisplay) // Default value is width size of screen viewGroupWidth = deviceDisplay.x } override fun onLayout(changed: Boolean, l: Int, t: Int, r: Int, b: Int) { val count = childCount var curWidth: Int var curHeight: Int var curLeft: Int var curTop: Int var maxHeight: Int // Set new size of group after measure viewGroupWidth = measuredWidth // Get the available size of child view val childLeft = this.paddingLeft val childTop = this.paddingTop val childRight = this.measuredWidth - this.paddingRight val childBottom = this.measuredHeight - this.paddingBottom val childWidth = childRight - childLeft val childHeight = childBottom - childTop maxHeight = 0 curLeft = childLeft curTop = childTop for (i in 0 until count) { val child = getChildAt(i) if (child.visibility == GONE) return // Get the maximum size of the child child.measure( MeasureSpec.makeMeasureSpec(childWidth, MeasureSpec.AT_MOST), MeasureSpec.makeMeasureSpec(childHeight, MeasureSpec.AT_MOST) ) curWidth = child.measuredWidth curHeight = child.measuredHeight // Wrap is reach to the end if (curLeft + curWidth >= childRight) { curLeft = childLeft curTop += maxHeight maxHeight = 0 } // Do the layout child.layout(curLeft, curTop, curLeft + curWidth, curTop + curHeight) // Store the max height if (maxHeight < curHeight) { maxHeight = curHeight } curLeft += curWidth } } override fun onMeasure(widthMeasureSpec: Int, heightMeasureSpec: Int) { val count = childCount // Measurement will ultimately be computing these values. var maxHeight = 0 var maxWidth = 0 var childState = 0 var mLeftWidth = 0 // Iterate through all children, measuring them and computing our dimensions from their size. for (i in 0 until count) { val child = getChildAt(i) if (child.visibility == GONE) continue // Measure the child. measureChild(child, widthMeasureSpec, heightMeasureSpec) maxWidth += maxWidth.coerceAtLeast(child.measuredWidth) mLeftWidth += child.measuredWidth // Some special case we have gap in the end of life so we need to recalculate size of list tag if (i < count - 1) { if (mLeftWidth + getChildAt(i + 1).measuredWidth > viewGroupWidth) { maxHeight += child.measuredHeight mLeftWidth = 0 } else { maxHeight = maxHeight.coerceAtLeast(child.measuredHeight) } } else { maxHeight = maxHeight.coerceAtLeast(child.measuredHeight) } childState = combineMeasuredStates(childState, child.measuredState) } // Check against our minimum height and width maxHeight = maxHeight.coerceAtLeast(suggestedMinimumHeight) maxWidth = maxWidth.coerceAtLeast(suggestedMinimumWidth) // Report our final dimensions. setMeasuredDimension( resolveSizeAndState(maxWidth, widthMeasureSpec, childState), resolveSizeAndState( maxHeight, heightMeasureSpec, childState shl MEASURED_HEIGHT_STATE_SHIFT ) ) } }
Note: Since the child views are not always the same length, the number of elements per row will not be the same so there will be gaps at the end of the row because there is not enough room to add a new view. When calculating, you must also calculate those gaps.
3. Add a custom view to the layout
You have completed your custom view, now put it in your desired layout
As requested above, I will have a custom tag view above and a list below
<?xml version="1.0" encoding="utf-8"?> <androidx.constraintlayout.widget.ConstraintLayout xmlns:android="http://schemas.android.com/apk/res/android" xmlns:app="http://schemas.android.com/apk/res-auto" xmlns:tools="http://schemas.android.com/tools" android:layout_width="match_parent" android:layout_height="match_parent" app:layout_behavior="com.google.android.material.bottomsheet.BottomSheetBehavior"> <com.mata.weather.live.myapplication.CustomTagView android:id="@+id/tagView" android:layout_width="0dp" android:layout_height="wrap_content" android:layout_marginHorizontal="12dp" android:layout_marginTop="4dp" android:layout_marginBottom="12dp" app:layout_constraintEnd_toEndOf="parent" app:layout_constraintStart_toStartOf="parent" app:layout_constraintTop_toTopOf="parent" /> <View android:id="@+id/viewDivide" android:layout_width="match_parent" android:layout_height="0.5dp" android:layout_marginTop="12dp" android:background="#cccccc" app:layout_constraintEnd_toEndOf="parent" app:layout_constraintStart_toStartOf="parent" app:layout_constraintTop_toBottomOf="@+id/tagView" /> <androidx.recyclerview.widget.RecyclerView android:id="@+id/rcvDemo" android:layout_width="0dp" android:layout_height="0dp" android:background="#ECEFF1" app:layoutManager="androidx.recyclerview.widget.LinearLayoutManager" app:layout_constrainedHeight="true" app:layout_constraintBottom_toBottomOf="parent" app:layout_constraintEnd_toEndOf="parent" app:layout_constraintStart_toStartOf="parent" app:layout_constraintTop_toBottomOf="@+id/viewDivide" tools:listitem="@layout/item_selection" /> </androidx.constraintlayout.widget.ConstraintLayout>
4. Create an Item for the Tag
As in the example above, we will have 2 types of tags
Element has been selected

<?xml version="1.0" encoding="utf-8"?> <androidx.constraintlayout.widget.ConstraintLayout xmlns:android="http://schemas.android.com/apk/res/android" xmlns:app="http://schemas.android.com/apk/res-auto" xmlns:tools="http://schemas.android.com/tools" android:layout_width="wrap_content" android:layout_height="wrap_content" android:paddingTop="8dp" android:paddingEnd="8dp"> <View android:id="@+id/bgView" android:layout_width="0dp" android:layout_height="32dp" android:background="@drawable/bg_tag_item" app:layout_constraintBottom_toBottomOf="parent" app:layout_constraintEnd_toEndOf="@+id/barrierEnd" app:layout_constraintStart_toStartOf="@+id/tagTextView" app:layout_constraintTop_toTopOf="parent" /> <androidx.appcompat.widget.AppCompatTextView android:id="@+id/tagTextView" android:layout_width="wrap_content" android:layout_height="wrap_content" android:paddingStart="8dp" android:paddingEnd="6dp" app:layout_constraintBottom_toBottomOf="@+id/bgView" app:layout_constraintStart_toStartOf="parent" app:layout_constraintTop_toTopOf="@+id/bgView" tools:text="Test Tag View" /> <androidx.appcompat.widget.AppCompatImageView android:id="@+id/imgClear" android:layout_width="10dp" android:layout_height="10dp" android:layout_marginEnd="6dp" android:src="@drawable/ic_close" app:layout_constraintBottom_toBottomOf="@+id/tagTextView" app:layout_constraintStart_toEndOf="@+id/tagTextView" app:layout_constraintTop_toTopOf="@+id/tagTextView" /> <androidx.constraintlayout.widget.Barrier android:id="@+id/barrierEnd" android:layout_width="wrap_content" android:layout_height="wrap_content" app:barrierDirection="right" app:barrierMargin="12dp" app:constraint_referenced_ids="imgClear" /> </androidx.constraintlayout.widget.ConstraintLayout>
Search view bar

<?xml version="1.0" encoding="utf-8"?> <FrameLayout xmlns:android="http://schemas.android.com/apk/res/android" android:layout_width="wrap_content" android:layout_height="wrap_content" android:paddingTop="8dp"> <androidx.appcompat.widget.AppCompatEditText android:id="@+id/edtSearch" android:layout_width="wrap_content" android:layout_height="32dp" android:background="@color/white" android:focusable="true" android:focusableInTouchMode="true" android:hint="Search..." android:inputType="text" android:minWidth="150dp" android:textSize="14sp" /> </FrameLayout>
5. Initialization and handling of the View Tag
Because the requirement here is that we will have a search bar and every time we add a new element, the search bar will be pushed to the end of the row.
Step 1: We will not create a Tag View with one element, the search bar
private fun initTagView() { val layoutInflater = layoutInflater val tagView = layoutInflater.inflate(R.layout.item_tag_search, binding.root, false) val edtSearch = tagView.findViewById<AppCompatEditText>(R.id.edtSearch) binding.tagView.addView(tagView) edtSearch.textChanges() .debounce(500) .distinctUntilChanged() .mapLatest { searchKey -> adapter.getFilter().filter(searchKey) }.launchIn(CoroutineScope(Dispatchers.Main)) }
Step 2: Each time we add a new item, we will add it to the position before the search item
private fun handleItemSelected(index: Int, isChecked: Boolean) { val tagView = layoutInflater.inflate(R.layout.item_tag, binding.root, false) tagView.tag = index val tagTextView = tagView.findViewById<View>(R.id.tagTextView) as TextView tagTextView.text = items[index].content binding.tagView.addView(tagView, binding.tagView.childCount - 1) tagView.setOnClickListener { // Handle logic when click to tag } }
6. Handling interaction with items
This will depend on the specific interface requirements of each screen, but most will have some basic logic like this:
Logic 1:
When you click on an item that is not selected, it will be added to the tag
When you click on an item on the tag, we will remove that item from the tag
When you click on the selected item on the list, we will remove that item from the tag
private fun handleItemSelected(index: Int, isChecked: Boolean) { val layoutInflater = layoutInflater val tagView = layoutInflater.inflate(R.layout.item_tag, binding.root, false) tagView.tag = index if (isChecked) { val tagTextView = tagView.findViewById<View>(R.id.tagTextView) as TextView tagTextView.text = items[index].content binding.tagView.addView(tagView, binding.tagView.childCount - 1) tagView.setOnClickListener { handleRemoveTag(tagView.tag as Int) notifyItemChanged(tagView.tag as Int) } } else { handleRemoveTag(tagView.tag as Int) } items[index].isSelected = isChecked } private fun handleRemoveTag(tag: Int) { for (i in 0 until binding.tagView.childCount - 1) { val view = binding.tagView.getChildAt(i) if (tag == view.tag) { binding.tagView.removeViewAt(i) items[tag].isSelected = false } } } private fun notifyItemChanged(tag: Int) { val index = adapter.itemFilter.indexOf(items[tag]) adapter.notifyItemChanged(index) }
Logic 2:
When you search, the list must change according to keywords
edtSearch.textChanges() .debounce(500) .distinctUntilChanged() .mapLatest { searchKey -> adapter.getFilter().filter(searchKey) }.launchIn(CoroutineScope(Dispatchers.Main))
7. Conclusion
Recently Google has also launched a type of Chips View that I will learn more about and update and will update the new solution in the next article.


Bình luận